Sunday, June 7, 2015

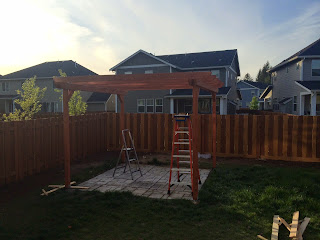
Pergola Patio

The concept.  HOA required a 5' setback before approving.

The materials:
8 wooden stakes
landscapers twine
Quickrete concrete mold
32 - 80lb bags of Quickrete
Wheelbarrow
Spade
Shovel
Hoe
Hand shovel
Trowel
Grout float
Level
Chop saw
4 - galvanized post anchors
various 3/8" galvanized lag bolts, washers and nuts
Galvanized deck screws
4 - 4x4x8 cedar posts
10 - 2x6x12 cedar boards

The blank canvas.

Staked off with landscapers twine to mark footings and perimeter lines.  I wish I would have thought of spray paint at this point.

First few courses. We were leveling as we went, which added unnecessary fuss time.

Making progress more quickly after leveling the remaining square.

Ready for curing.  Poured a few extra pavers with leftover concrete.

 The first step in the framing process was to lay out the beams and rafters where we could reach them.  This was we were able to mark the positions of each one, rather than having to measure and mark while up on a ladder.

 Next we installed the posts, plumbed them and braced them.  We chose galvanized adjustable post anchors knowing that the yard was not perfectly level, and knowing we are novice carpenters who might need a way to forgive small mistakes.

 temporarily screwed the beams into place.

 Angle brackets were installed to brace the walls for shear.


Rafters go up.


Small privacy screen gets installed.

Fine'


Work Bench

The plan was to set out to build this basic work bench.
First, I precut all the pieces and laid them out.


Next, I clamped the pieces, checked for square, drilled pilot holes and attached with 1/4" carriage bolts.

Next was to install brackets that I was going to use to enhance the functionality of the bench, using this image of a Roll-Around Workbench as a guide.


Next I installed the cross pieces and bolted them in.

Next came the base shelf and casters (two stationary and two swivel with locking mechanism).

Pinned the tabletop down with a pneumatic nailer.

Installed the end shelf so the table saw was flush with the tabletop, and viola!


Sunday, December 28, 2014

Man Cave

On Christmas eve, I lost patience and gave Chad his present early. 


The inspiration.
Of course, some assembly was required, so the following pictures outline the steps we took to assemble his Sci-Fi Man Cave.

We started with the blank slate that was our loft space. It had been an ad hoc storage room since we moved in last August.
We knew what we wanted to do.  After pinning a lot of ideas onto Pinterest, we set out to tape off a feature wall to get an idea of scale to see how far-fetched our ideas were.
We chose paint colors that would facilitate the multimedia purpose for the room.

Next we installed 2x4's vertically along wall studs to support the floating feature wall.
Horizontal supports were also nailed to studs to keep the drywall from flexing as well as to provide a nailer for the TV and multimedia wall mounts. A few supports were added to the ceiling at the trusses to support the ceiling portion of the feature wall. We pre-planned where cords were going to feed once the sheetrock was in place.
We chose 1/4" drywall for several reasons. It can be taped and mudded smooth. 1/4" is light weight enough for two people o hang without sophisticated tools. The thickness did not have to be up to fire code because it was going over a finished wall. Drywall is easy to cut for hiding a mess of cords.
Several coats of black paint-and-primer-in-one gave it the look we were after. Some tape was left in place to remind us where the nailers were placed.
Holes were cut for cords to pop out behind the TV and behind the cabinet holding components.
The IKEA Besta TV Cabinet is mounted at the lower horizontal 2x4 nailer.
TV is mounted and components are plugged in.
Furniture is brought into the room.
Aside from additional artwork and lighting to be added later, we have the hard part done.
Almost done.


There we go!


Sunday, August 31, 2014

Master Bedroom Paint

This is the first of what I hope to be a long line of home improvement projects.  I am the happy owner of a Craftsman inspired home, and I have every intention of introducing some old world charm into this new build.  I have big plans for some finish carpentry, but like all new homeowners, I'm going for the biggest bang-for-my-buck project, interior paint.  It's been a month, and I'm getting tired of white walls!

The first item up for bid is the master bedroom.  Months ago, while the house was nothing more than a shell of framing, I had decided to paint an accent wall in my room that was inspired by a mosaic tile pattern I'd seen.  With the help of my partner, Chad, a professional video game environment artist, we came up with the concept.


Three of the colors are Behr. Medieval Forest, Scotland Road, and Mystic Sea.  The last color is Ralph Lauren Silver Grey Metallic.

To accomplish this pattern, we first needed to tape off the wall every square foot.


Plumb lines were particularly challenging, but a 4' level was our tool of choice.


Next came the horizontal lines.  The laser level became our best friend.


The resulting pattern reminded me of a gingham picnic blanket.


The pattern really began to take shape once we cut away the unnecessary tape to reveal the intended geometry.


Two and a half hours later we could begin to paint.  One color...


Two colors...

Three colors...

Four.  It looked like kind of a mess, and I really started to lose my patience to pull the tape off.


Once I did though...


And the result was well worth the effort. Although, Bueller might disagree, having been exiled for the day.  He was happy to assume his normal position, and we were happy to go to bed after a long day!